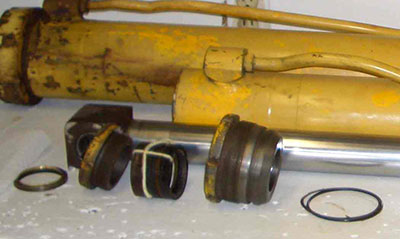
Repacking a Hydraulic Cylinder
When you have a leaking hydraulic cylinder, it likely needs to be repacked. Although cylinder types vary, the repacking process is generally the same.
You'll need certain tools and items to perform the task. They will include a pipe wrench, a spanner wrench, hammer, smaller tools able to pull out old seals and snap rings such as needle nose pliers or an o-ring pick. Other tools may be needed depending on what type of cylinder you have. You'll also need a container such as a bucket to catch oil and a rag for wiping.
First you need to pull the cylinder apart. To do this you need to remove any pins holding the cylinder in place. There will be a nut at the end of the cylinder. With a spanner wrench and a hammer, loosen and remove the nut. Before you pull the rod out, be sure the the gland threads have completely cleared the cylinder.
Need a Hydraulic Cylinder or a Seal Kit?
Call a Parts Specialist Today
Behind that nut you'll find a large plastic seal. Eventually, you will replace this seal with a new one so keep that in mind. It will not slide over the end of the cylinder rod. Instead, it will go over the end with the bolt on it.
Remove the hoses from the cylinder. This should include loosening a clamp that holds the hose. Where the hose connects to the cylinder port, there is a small rubber o-ring. Be sure not to lose those.
Clean up the end of the cylinder as much as possible as rust and dirt builds up.
You then need to remove a large round snap ring on the inside of they cylinder surrounding the rod. You will may need a screwdriver and a little patience to pry it out of there.
One way to get the rod out is to put a bar through the end of the eye of the and pound the bar to get the rod out of the cylinder. Another popular way is to secure the cylinder, tie a rope or chain to the eye of the rod, tie the other end to a car or truck and carefully pull the rod out. Place a bucket under the cylinder to catch the oil that will spill out. Once the rod is out, it's a good practice to wrap the openings in rags to help keep dirt out.
Remove the bolt at the other end of the rod. It takes a lot of leverage to remove the bolt so you may need assistance.
The rod can now be disassembled. The bolt and piston will come off the end and then you slide the gland off the shaft. The gland is the part that holds the seals. Lay the components out in a clean area. On top of cloth or cardboard would be good. Using steel wool, polish and smooth the rod the best you can. Look for areas stones and debris have caused some surface damage.
Carefully pull out the seal, wear ring and any other parts inside the gland and replace them with new ones. Be sure to take note of how they are assembled when you take it apart so you can put the new parts back the same way.
The piston will have a wear ring, V-packing, and other seals. You pull the piston apart and pull those parts out.
A good way to help organize the seals, the direction and order of their installation is to stack the seals accordingly on a pipe. Taking notes would also be a good practice.
You may have to purchase two separate kits, one for the rod and one for the bore. Other kits include all the parts needed in one kit. Most kits have aftermarket options that cost much less than the OEM seal kits.
You should clean the gland and piston before installing the new parts.
As you install the new seals into the gland, be sure to oil everything well to help the ease at which the new parts will go in. Although it will be tempting, don't use tools directly to insert and position the seals in place as you run the risk of damaging a seal. You will likely need a hammer to get the seals in place but you should use wood or something to buffer the blows.
Once you have put the new seals into the gland and onto the piston, you are ready to reassemble the cylinder onto the machine.
Prepare the rod for the necessary leverage to torque the bolt into the end of the rod. Pinning the rod back on the machine is one way to achieve this. Once the bolt is secure, take the rod and install a new plastic o-ring between the gland and they cylinder nut. You can slide it over the bolt and packing end of the rod, you cannot slide it over the eye of the piston.
At this time you should sand and clean the end of the cylinder to remove debris and loose metal that could immediately compromise the newly packed gland when you're ready to slide the rod back in.
Slide the rod back in once the cylinder is prepared to receive it. You will likely have to hammer the rod to get the threads of the gland to meet up with the cylinder. Once you have screwed the gland back in place, you will secure a set screw and your resealed cylinder will be ready for use.


